Workshop Experience : Semester B Week 7 Landscape and Architecture
Week 8 and we are now looking at Architectural and Landscape photography, two genres I have avoided a fair bit so will be a steep learning and creative curve for me. Hoping to get up to some country locations next week to try and get some frames.

After the fun and excitement of studio portraiture things changed gear this week and we entered in to some new areas for me - and areas that I need to understand better and improve upon - being Landscape and Architecture.
Although I do do some landscape work with my flying camera and try to abstract out the urban and rural landscapes around me, this week was emphasised as "traditional" landscape - being an image with a foreground, middle ground, and background, where nature is the key element in the frame. So there goes my aerial work ! But this is a good thing for me, as I rarely take my standard Canon out and shoot landscapes - a challenge will be had. There are so many technical aspects to landscapes - filters or not, long vs normal exposure, hyperfocal distances, sturdy tripod, isolated areas where things can go wrong, etc etc.
I will try and keep it simple and try and capture some frames up near my friends farm in Mansfield Victoria, and I will use the following gear to try and do it :
- Good sturdy tripod and my Canon 6D with the 16 - 35mm lens
- will try our my 10 stop Big Stopper filter, as well as the trusty polarizer (to try and remove reflections and sun shine form water etc) and a 3 stop graduated ND filter such that I can adjust the tonal values of the bright sky whilst maintaining expose to get detail in the shadows of the ground or trees or whatever it may be - lot of trial and error here
- will be using bracketing to ensure i get every bit of tonal value I can and detail
- have fun and hopefully see some great aspects of the land. Ansel Adams will not be in any danger.
The Architecture aspect of the portfolio will be even more challenging.
There are no shortage of great buildings in Melbourne so the challenge is to get the interesting composition and the camera craft right to get the right image. We learnt about Trevor Mein and John Gollings and how they make this genre of photography so engaging. Really quite inspiring as I would never have been interested in shooting buildings otherwise.
Will be getting out and exploring some buildigs this week both early in morning and at night hopefully.
Workshop Experience : Semester B Week 6 Documentary Portraiture
Big week again - and weekend. In class it was all about Street Portraiture and interacting with strangers to get a shot and live to tell the tale. Lab time was spent looking in to setting up print runs and proof read prints etc. We also had an extra two days over the weekend spent deep diving off camera flash and studio portraiture. Great experience and awesome learning environment with our two weekday teachers.

This week was all about street portraiture and getting out there amongst it and trying to capture both posed and unposed street portraits.
Melbourne Australia is a funny place to shoot street. Most of the time people are more than happy to pose or get captured unawares. Obviously you need to pick your subjects as some people simply do not want the intrusion which is absolutely fine. But given that even our busiest streets are pretty empty by global big city standards, you really cant help but get noticed by people when taking photos on the street - no matter how small and discrete your gear is.
And I find at night that it is always the more edgy, drunk and or messed up people that spot you first and then have to know what is going on, even when you have not shown any interest in getting their image ! Its quite funny.
Then you get the people that are just dying for some interaction and attention, and would gladly pose for any amount of time to help you get a shot.
Having shot some street in a number of cities around the region, it is easier in the highly populated ones to stay hidden and discrete rather than the less populated areas, but Melbourne is also good too because at least its home and you can get a better general insight in to what may be going on around you and choose accordingly.
After some on deck time out and about shooting some street portraiture, in our lab class this week we were going through how to prepare our photos for print. This side of the learning is really interesting - how to interface with external capabilities such as printers, the naming conventions used, the ways in which they like to receive their orders, etc. We also learnt how to set up the right templates in PS to enable a proof run first, then we can check the images, then press the big go button for full scale printing. All good stuff.
I actually just got some 1m by 1m prints done of some aerial abstracts and I am really happy with the results - and the cost. I used CPL Digital in South Melbourne and can't recommend them enough. Very helpful and supportive team that work there, great online process to upload and request your print jobs, and a real hands on customer interaction which I enjoy.
The weekend just passed was also an extra part of the course - a weekend spent focussed on using off camera flash both outside and in a studio. PSC do this well - and so they should as it is an extra cost - but you get two teachers hands on for the weekend and access to all their expertise and experience. Its really very unique and a great learning environment and experience.
This one we spent day 1 out in the streets and lanes of Melbourne using off camera flash and reflectors to get a more sophisticated style of portrait (hopefully!). Day two was spent all in doors and in the PSC studio - playing with off camera flash, flash compensation, umbrella spill, and backdrops. Learnt so much, and realised again how much there is still to learn. The two teachers ability to analyse and problem solve a lighting situation and get it setup in next to no time was great to watch and be around... will get there in a decade or so hopefully!

Workshop Experience : Semester B Week 5 Portraiture
Week 5 proper in class and we are getting all over portraiture photography !
This week we went through in detail the different genres of portraiture and how the particular genre is to be shot to get the best effect. Portraiture I love but have only really played with street style portraiture - randoms stopped in the street and posed in the street environment at the time. I am looking forward to the studio style portraiture we now need to play with.
Our portfolio will need to cover :
- Environmental, where we capture not only the subject but also the surrounds to help add to the story we are trying to tell. Eye contact is critical for this genre. Check out the work of Arnold Newman to see how a legend does it
- Group, being 3 or more people. Location and capturing how the group relate to each other is key. And is probably the hardest to achieve a good result.
- Straight, being your classic head/shoulders in to the lens type portrait. Background/surrounds less important and its all about the engagement in to the camera of the subject.
We have only just started on the lighting options around portraiture as well, but I will now start using a small off camera softbox flash capability as well as a reflector - will see what the results are like soon enough!
I picked up a pretty easy to read and instructive book on portraiture as well.
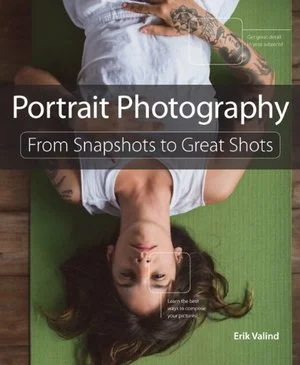
©Erik Valind
What I like about this book is you start out with understanding basics and the genres and camera settings and lenses etc, and then within chapters you are getting instruction on 2, 3 4 light source portrait setups either in a studio or outdoors. Really easy to follow, great examples of before light and after light portraits, and great step by step set up instructions and ideas. A great read for beginners and intermediates and especially because it doesn't push for equipment purchase and rather lets you see what can be achieved with a minimal kit list eg. a camera and maybe a off camera flash set up with a reflector. I found it very helpful in reinforcing in detail what we are learning about in class, and the light set up instructions and pictures are worth their weight. I recommend getting a copy if you are keen.
In the meantime, check out these great examples below from some masters !
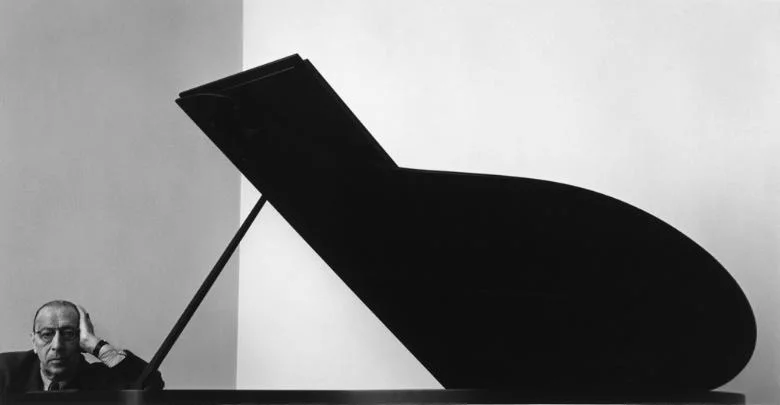
©Arnold Newman
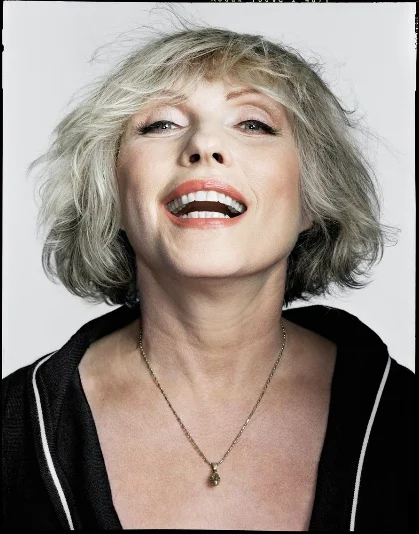
©Dan Winters

Workshop Experience : Semester B Week 5 Digital Lab
Week 5 in the digital lab and our Photoshop understanding is getting more and more detailed and intricate .
I have always found the lab sessions that are part of our course the hardest. I know my way around a computer ok and I can learn software programs like LR and PS enough to be dangerous - and thats the issue I have - I dont know if I want to get good at post processing because its a big black beautiful hole that I could find myself getting lost in forever!
The power of post is amazing in todays age of excellent applications and awesome user interfaces. Couple with the large amount of raw (RAW) data that you can capture from even an entry level DSLR, and bingo - you have the recipe for hours and hours of processing fun and betterment. Maybe.
With even my limited exposure to photography, getting it "right" in camera was one of the early doctrines I try to live by when capturing images. And even if it isn't right, live with it and improve the next time, and the next. So learning my way around Lightroom (LR) perfectly matched this view - LR is powerful enough to do some funky things, but easy enough to do just basic adjustments and then move on.
Now that I am getting more and more exposure to Photoshop CC (PS) I am understanding more the amazing array of adjustment and enhancement capabilities we can now deploy, if we know how and where to apply them.
And that is the balance I suppose - we all see images that have been pushed way too far in post, over worked with the clarity slider or way too much contrast for the image, or dodged and burnt in to pixel heaven - but there is a style in that as well and in the right hands and pen/mouse, works.
I will continue to try and get my head around all the power that is within PS and in particular for landscape and environmental images, will use these skills to hopefully improve the image overall.
Below are some before and afters using just entry level PS capabilities - Tonal Adjustment Layers, Masking, and Dodge and Burn.
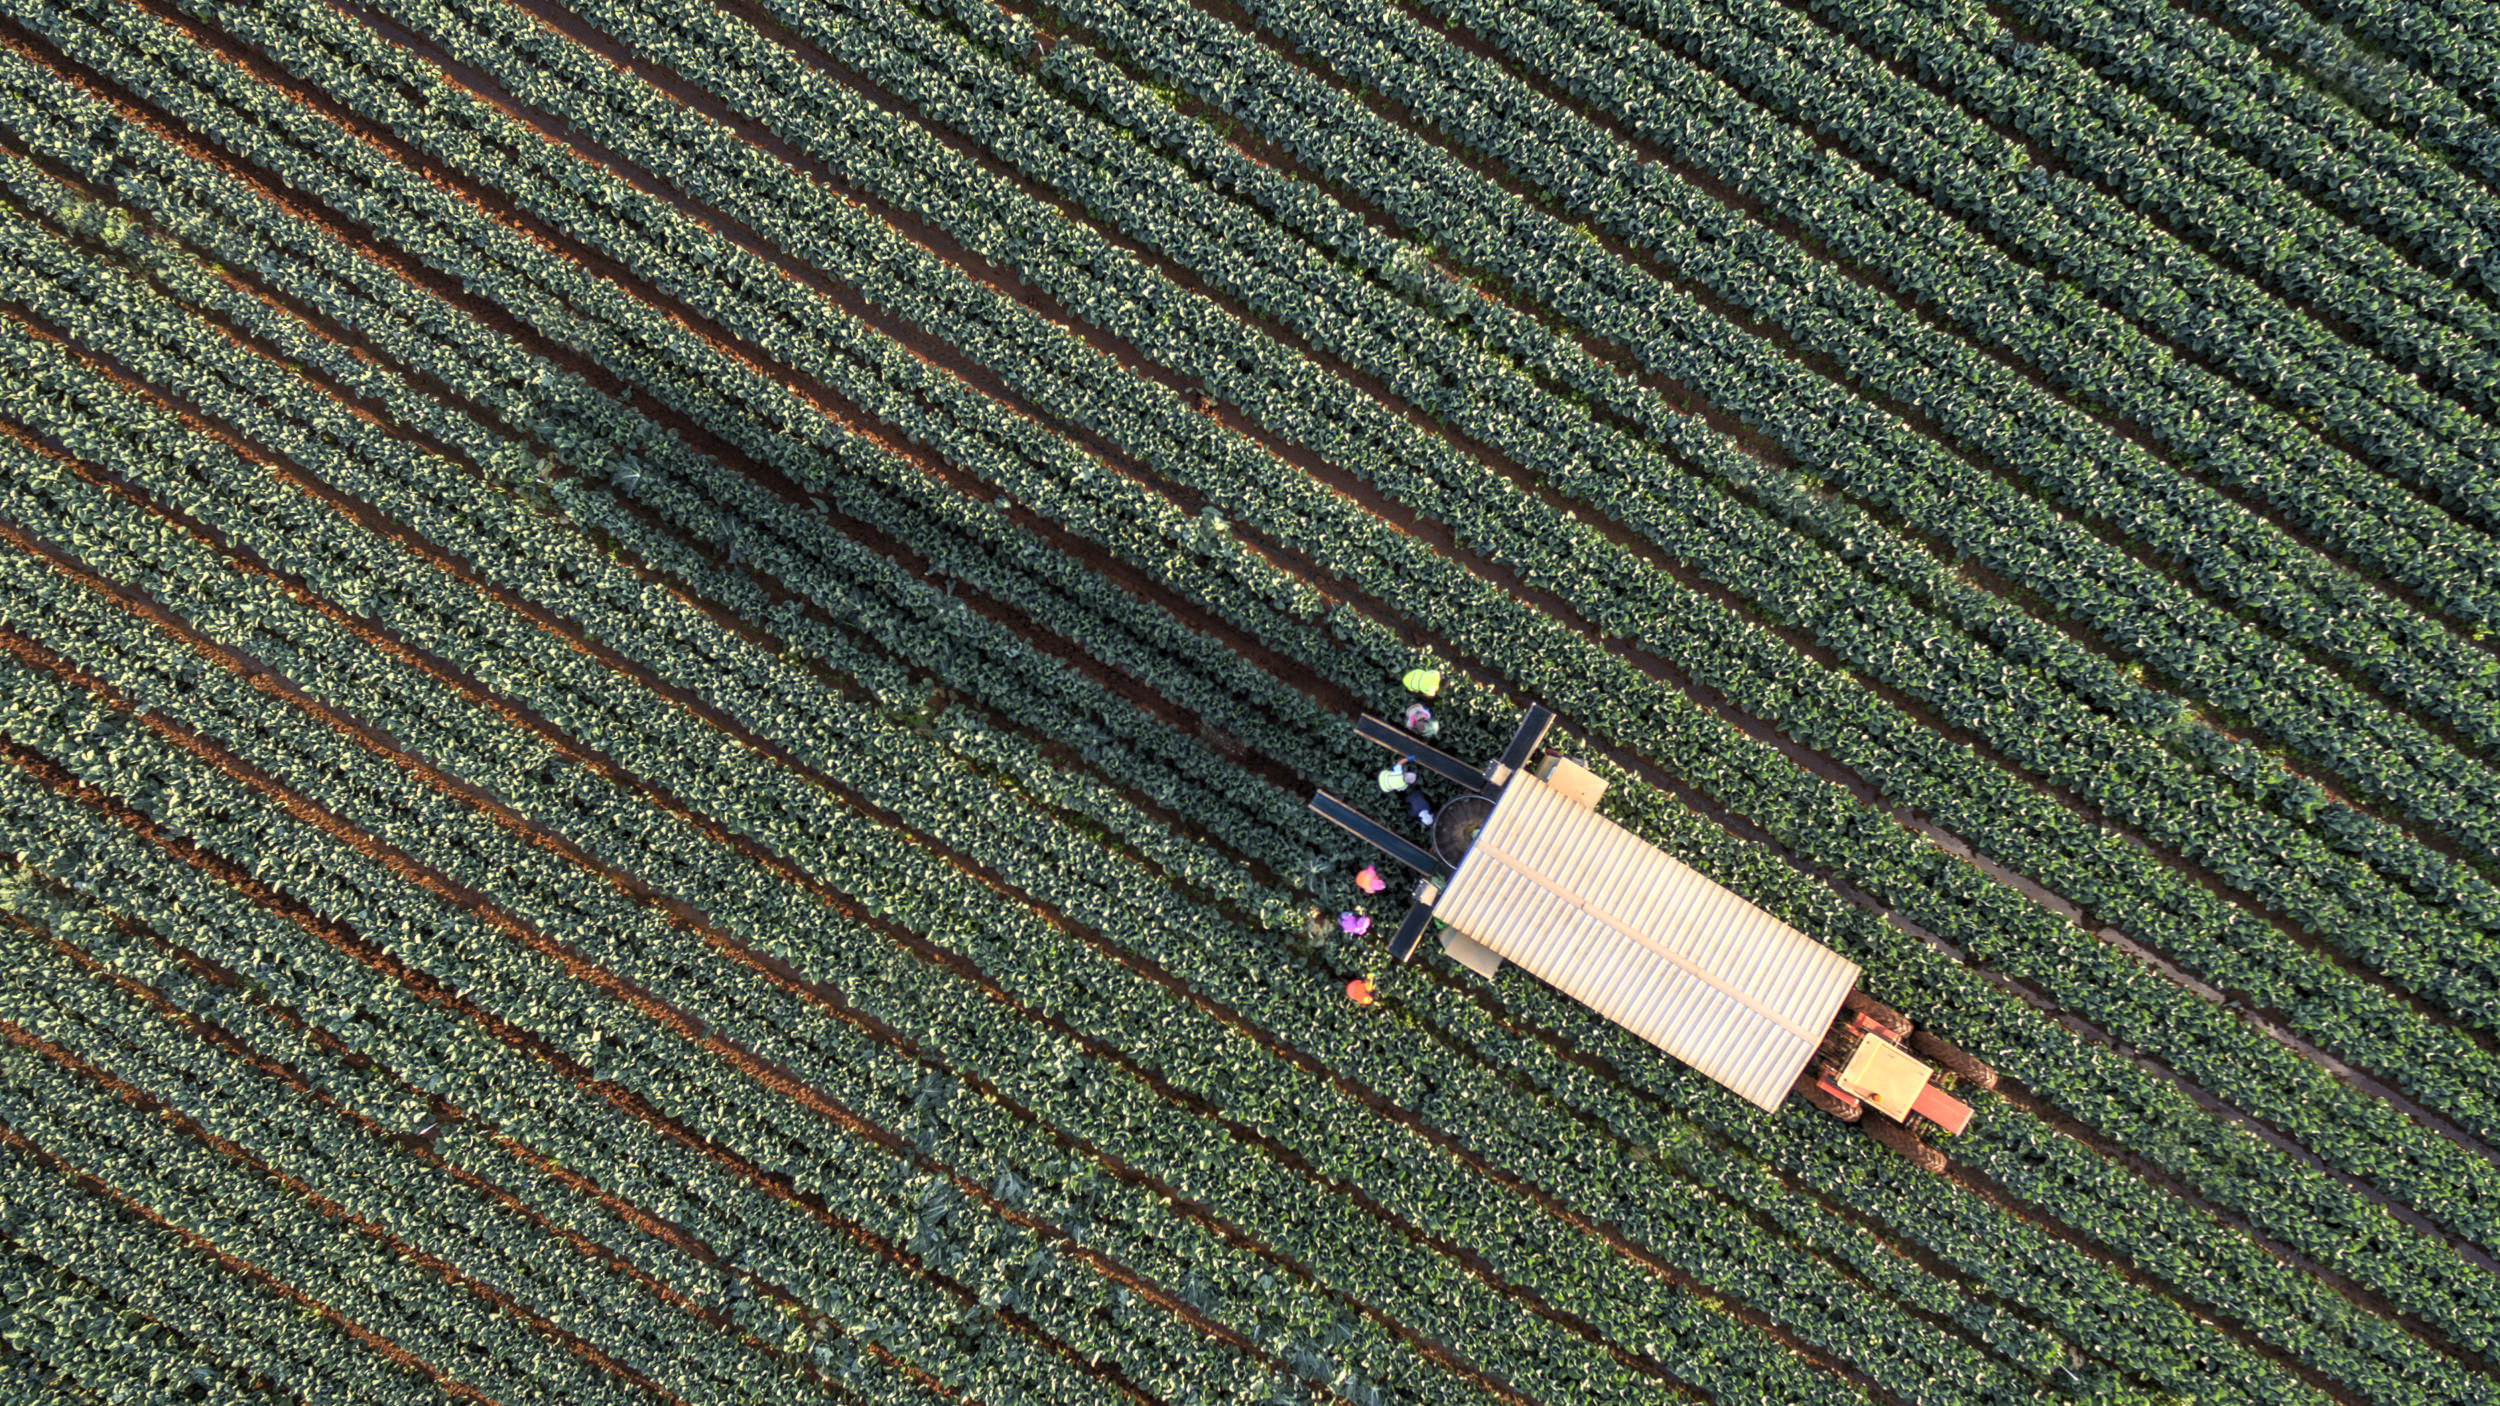
Aerial Landscape, DJI P3P, ISO200, f2.8, 1/200, 31metres


Portrait, Leica Q, ISO200, f5.6, 1/125, reflector from underneath subject


Portrait, Leica Q, ISO400, f7.1, 1/125

Workshop Experience Semester B : We are back in to it!
Catch up post of the first 4 weeks of our new Semester - two streams again, Practical focussing on Flash, Off Flash and other lighting techniques; and digital lab focussing on Photoshop and Printing. Off we go again !
Been very slack but we are back in to our learning experience - Semester B - and we are already up to Week 4. This Semester we are doing the practical stream based around using flash, reflectors, and using filters. The end of term assignment is similar to last Semester with a portfolio being created covering three areas : Inanimate (5 to 6 images), Animate (5 to 6 images), and Personal Expression (7 to 12 images). On the way we need to produce two key assignments, one covering Portraiture and the other covering Landscape. Its all go already ! The second stream in the digital lab is all about stepping it up with Photoshop and printing. It will be interesting for me as I have tried to avoid too much post processing prowess, but already the PS CC lab sessions are getting deep in to the tools and capabilities.
In the main stream classes, we have covered the introduction to our assignments, then we got in to practical sessions using flash, then last week we started moving the flash around and also started using reflectors. Whilst some of this was basic information, as is usual with this learning, there are always so many aspects to learn and remember, and our new teacher Roland really gets the messages across directly and clearly on what we are trying to achieve. Lots of before flash, flash, and flash compensation practise was had.
One thing I have discovered which I need more looking in to is on my Leica Q when flash is attached, that the only way I can compensate flash exposure is thru the menu as opposed to using the flash compensation dial. Dont know whether my flash is faulty (Leica SP40) or that is the way it is with the Q. Need to read the manual again ....
On the dig lab side of things as I mentioned its all about PS CC this semester.
Our workflow is still using LR as the front end, import the photos RAW's in to there, use the basic adjustments of LR along with profiling and lens correction, then edit the RAW in PS CC.
So far we have covered the basics of Clone stamp tool, spot tools, etc as well as Layers, Curves, Tonal adjustments and an intro to Masking. We will get there !!
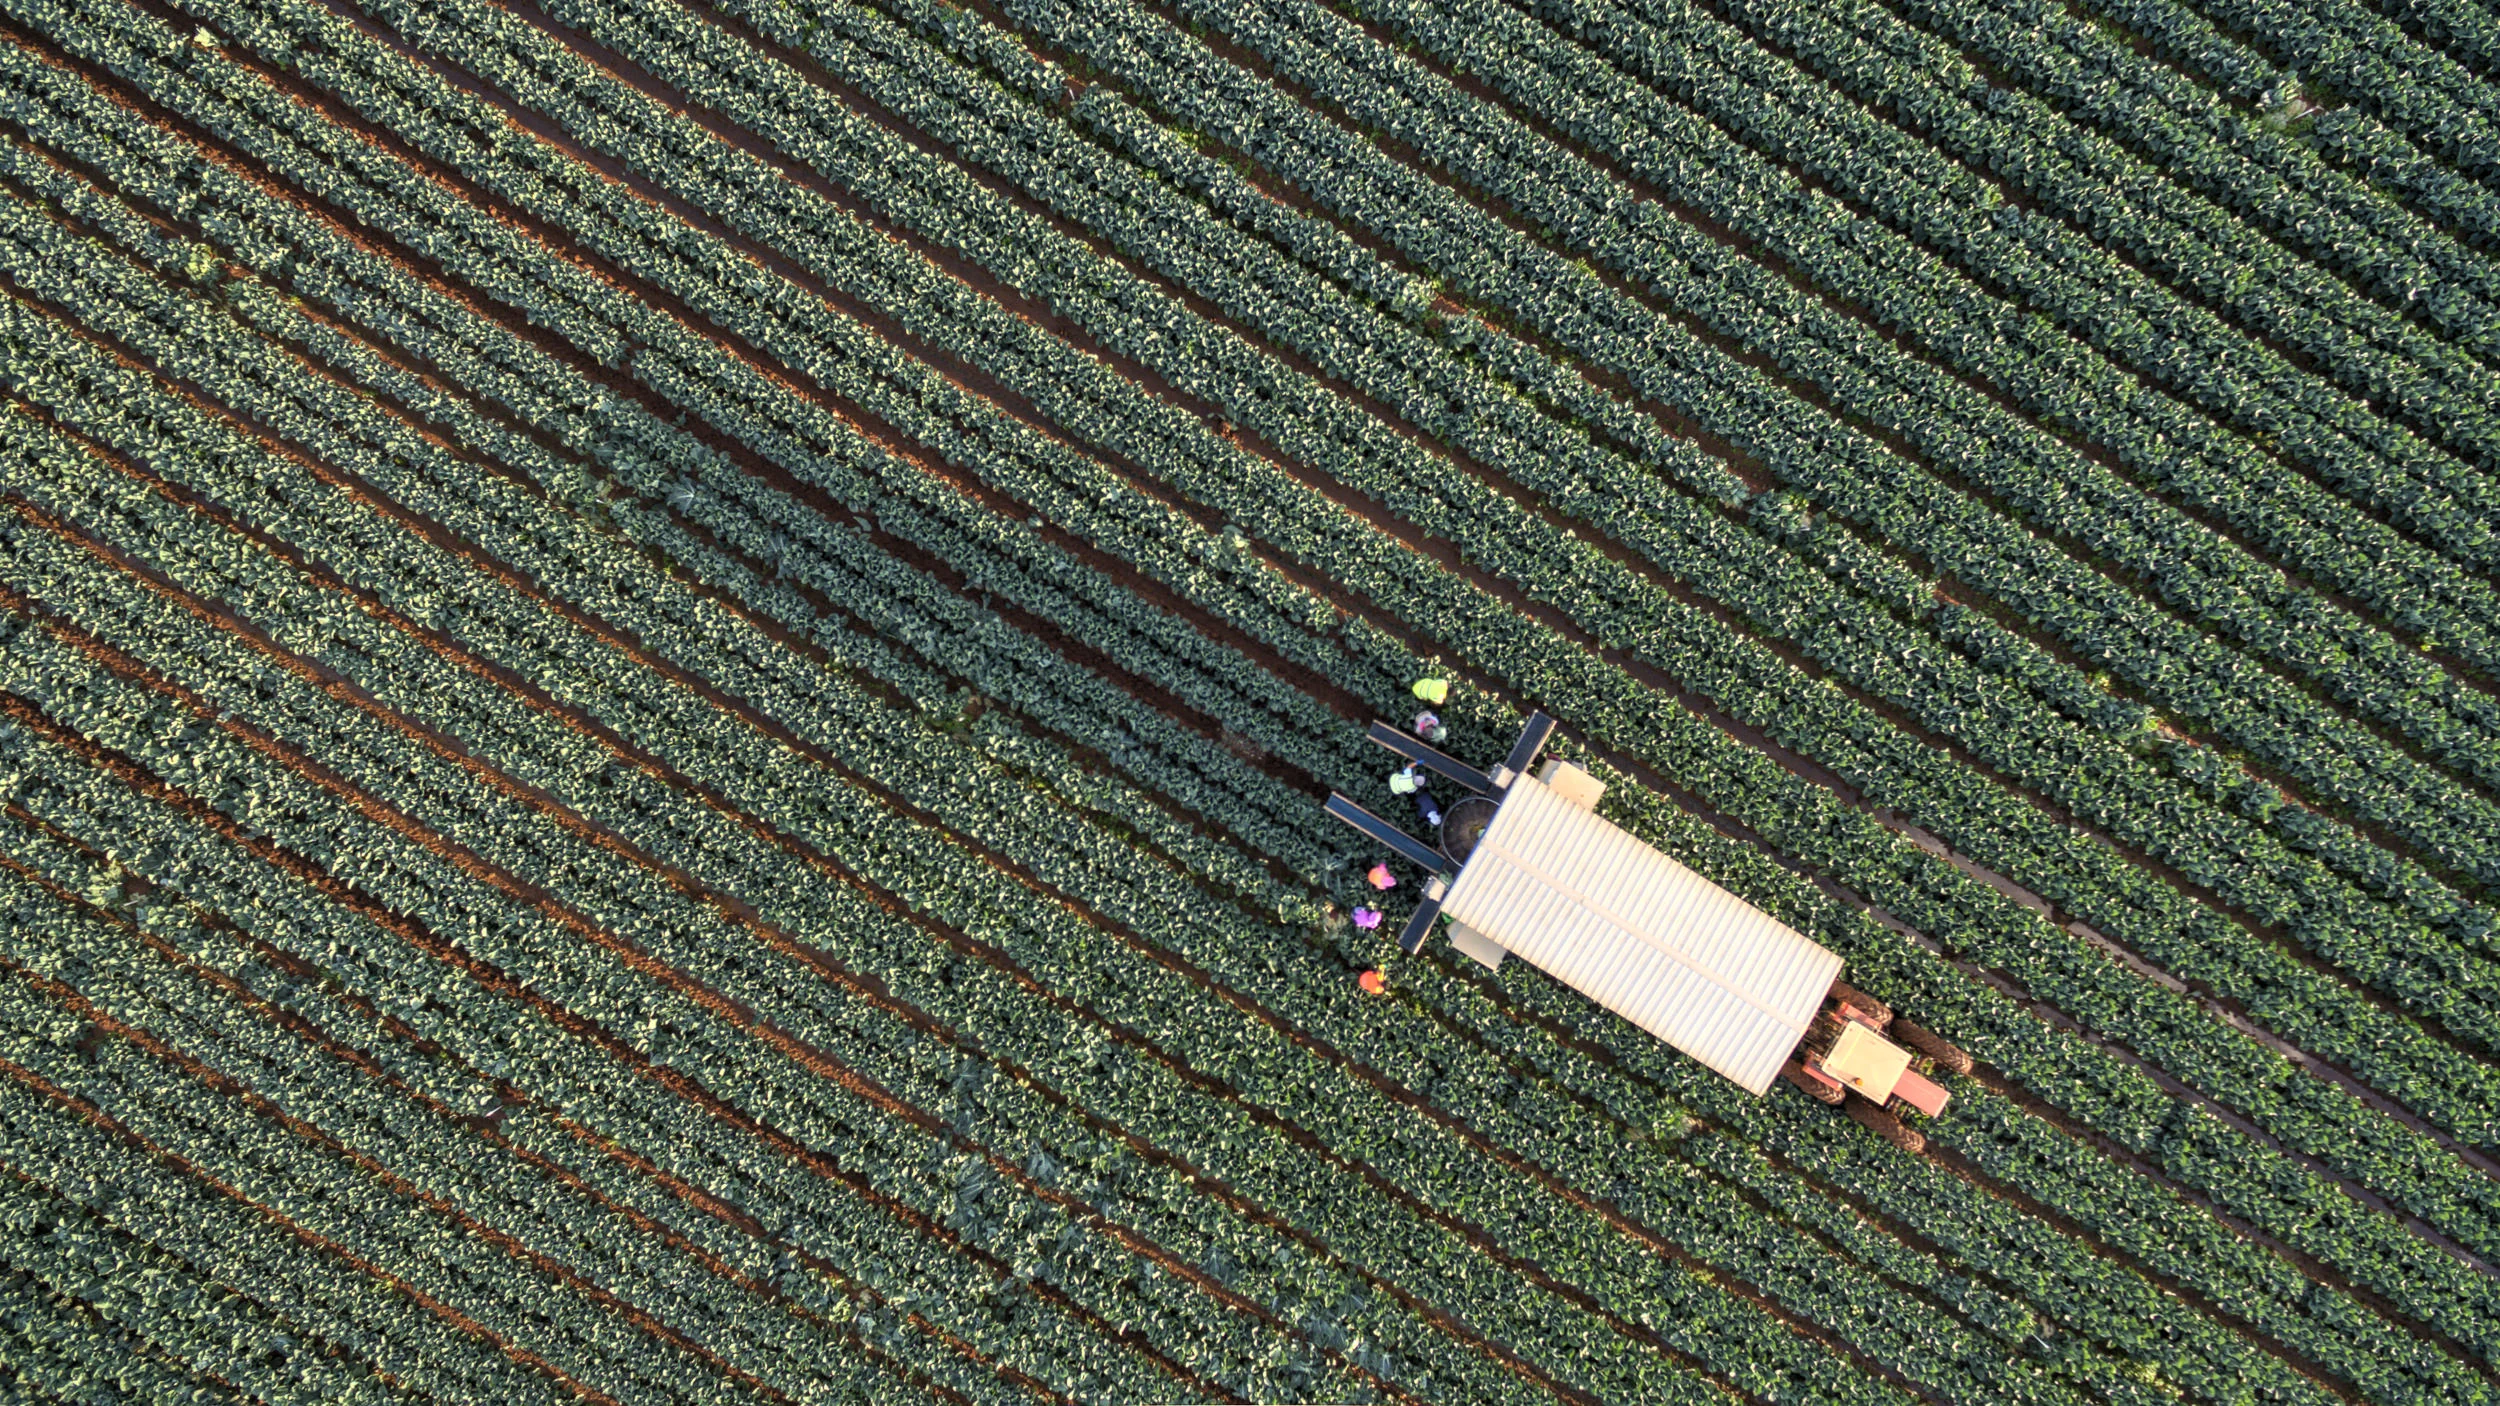
For the Landscape series and portfolio, I am working on some areas on Melbourne where we grow all our salad leaves and vegetables. Trial shot follows.
More detail about the semesters objectives and journey after next weeks sessions!.

Gear and Process Review : Starscapes and Timelapses
Been a while ! HNY! Thought I would share a little on how I have been capturing and editing some starscapes in to time-lapse videos. Enjoy.
Given I mainly enjoy street and aerial photography, I have been really surprised how much I have been enjoying trying to capture starscapes and making time-lapse videos. I really enjoy the process and anticipation, the waking the next day after 7 hours of shooting and inserting the SD card to see what you may have captured. Its sometimes disappointing, often frustrating, but every now and then its quite awesome to see what happens in our clear skies when most of us are asleep.
Following i thought I would share some tips and processes I use. There are of course so many great resources out there from people that are way more capable and competent and only too willing to share their expertise. I will list my favourites at the end of this post.
But for now, read on and I hope you enjoy the process as much as I do - to create what in the end is 15 to 20 seconds of quite cool vision.
Location and Timing
If you are lucky like me to live in the southern hemisphere and in Australia, the ability to get clean sky and space is almost unlimited ! Clearly getting away from the city and urban light pollution is key for maximising your chances of a great clear image, and also timing it for when the moon is either waxing or waning crescent, or even better, new. I use an app called Scope Nights (iOS only) which gives a great week in advance run down of astro conditions for any given GPS or google map co-ordinate. For the night in question it gives a breakdown of conditions for every 2 hours of the night which is great for planning a specific time block for your time-lapse. There are heaps of other great apps too (Photopills is a great all rounder and also helps in spotting the Milky Way and its path if you are unfamiliar with that in the location that you find yourself). Key is to be out there and amongst it and experiment with the different weather patterns at night - sometimes a modest cloud cover adds great drama and movement to the end time-lapse as well. Rain and frost are good things to avoid generally !!
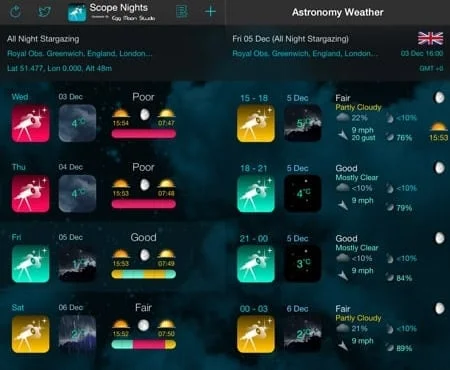
©Scope Nights app screenshot
Gear and Software
Well this is where you can really spend a lot of time - and money - to chase that never reached goal of the perfect starscape. And again, there is a lot more exhaustive information on the internet around what and which gear, but for what it is worth, this is what I use.
Camera (need one!) : Canon 6D - full frame is the way to go so its whatever you can afford and want. An optional two battery hand grip attachment is important also to ensure your camera can take as many frames as you need without running out of juice.
Lens (need one!) : 16 to 35mm L Series f2.8 II, and again, whatever you can afford but the 16mm range is perfect without too much unfixable distortion and abberation
Tripod (need one) : [pro]master xc525 carbon, sturdy, quick to put up and down, and very flexible in its settings
Remote (optional but very handy) : Canon TC-80N3 cable connected for extra reliability
Motion (optional but cool if you could be bothered learning another gadget) : Syrp Genie motion box plus 0.8m dolly ramp (been using the Syrp for panning motion for a bit and have just purchased the ramp so will review that once I have given it a try out or two)
Other bits : Plastic bag lens and camera cover to keep dust and dew and bird poo and stuff off the gear for the long period of time its out in the elements. Either recycle a plastic bag with elastic bands, or a cool fitted and cheap option is here. I have had the same cheap and cheerful plastic fitted one for over three years - bargain ! Some lens cleaner that is also dew preventive is a good idea also. The largest SD card you can afford is handy too !
Software : LR or poison of choice plus LRTimelapse. Not only is this program one of the best I have ever used, the guy who wrote it Gunther is an absolute legend in the way he supports the software and his customers, but also the great knowledge and processes he shares on his site. Just go there and read everything you can and do everything he says !
Books : suggested ebooks are Gunthers and Royce Bair - both great reads and extremely useful and insightful.
So now that all that is under our belts, best we get outside and get amongst it !
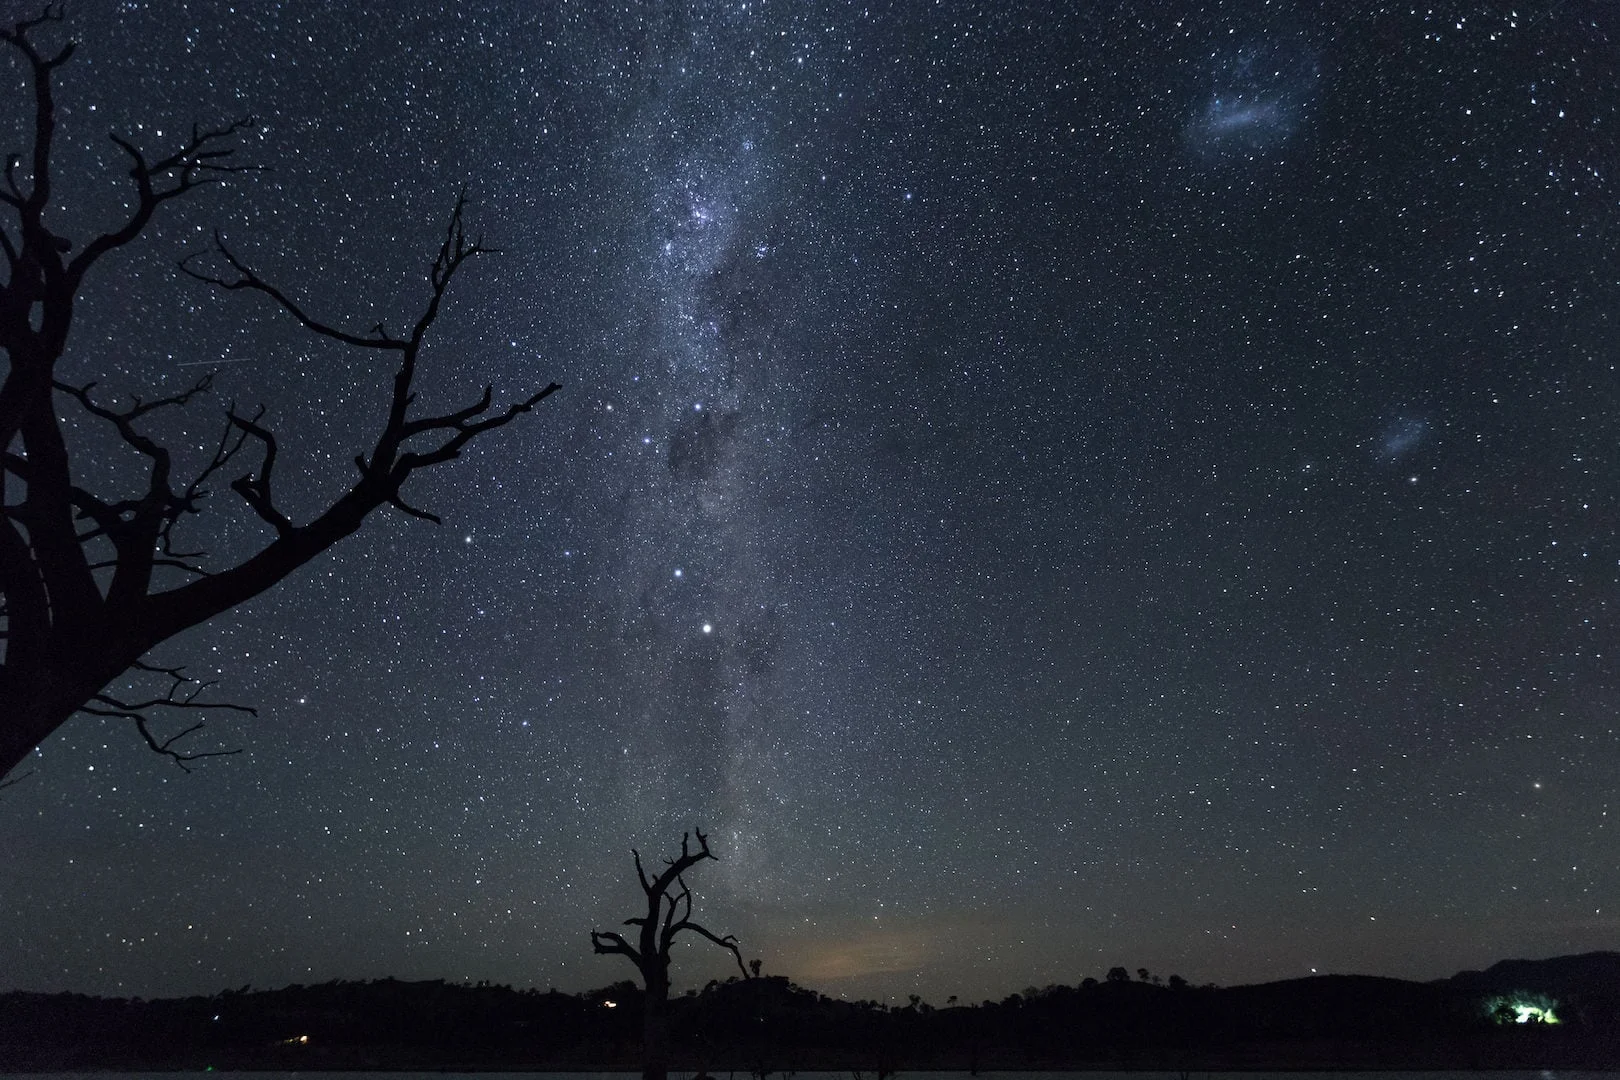
©LesWillPhoto Canon 6D, 16mm, ISO5000, f2.8, 24 sec exposure,
On the actual Shoot.
So once you have found your nice isolated, light noise free location with a new or near new moon rising, its time to set up the gear and let it do its magic. The settings I use I try to match what is actually infant of me and able to be seen with the naked eye. If any of you are interested in aurora shooting, please google and go and find those enthusiast sites for all the info - i have captured some southern style aurora light images, but find the fact that it is mostly sensor driven rather than naked eye driven a little disconcerting - I like to see what it is I am capturing to a large degree. But each to their own.
Settings:
White Balance : Use to use Auto as we are shooting in RAW so WB can be dialled in as needed in post, but when creating time lapses in post, its goor to have as close to reality white balance straight out of camera, so I am dialling in between 3800 and 4800 K as the WB setting - not too blue, not too green. Just right ...
ISO : I tend to use an ISO between 4000 and 6400, mainly around 5000 for most darker night conditions. ISO is something that depends on the type of camera and lens you are using and the quality of the sensor and ISO capabilities, so trial and error here. For my Canon 6D 5000 and even lower is a great image with manageable noise.
Aperture and Focal length : As wide as your wallet will let you is the answer. For the lens I use being the Canon 16 to 35 L series I am down at 2.8 for all my shoots. Length is 16mm but vary this depending upon our foreground capture and whether you are using a motion box or not.
Shutter speed : I use around 22 secs to 26secs with a 38 sec to 34 sec pause, giving a very simple to understand one frame per minute shoot. This again will vary on actual night conditions but 24secs is my failure. Be careful as there is a correlation between focal length of lens and time open for stars to ensure you get no or minimal star trailling. A whole course in itself so google away and see you in a few hours ! For a 16mm lens like mine, 24 secs is spot on.
Turn all other noise reduction, stabilisation, High ISO correction , etc etc OFF as they only detract from the image you are saving. Turn off if you can your screen display as well and keep all blinking lights to a minimum as best you can.
Of course, a handgrip battery holder to allow for multiple batteries is key, and with the cannon I can get about 7 hours of shooting easy, at 1 image per minute, gives 420 images to process for a time-lapse of around 14 seconds - nice.
Hope this has helped out a little with your own endeavours, and it has enthused you to get amongst it and enjoy. Its a great feeling to watch the end 15 second or so result, and you also get a lot of single images to enjoy as well if the moon gods are kind to you. Good luck !

Workshop Experience : Photography Studies College Final Week

Well its all over for Semester 1! Great experience, great learnings, and will definitely be doing next Semester in 2016!
Well who would have thought ... the last week of the Semester 1 of the Part Time PSC Pro Certificate course is upon us !
We have all been a mixture of excitement and angst to get our final images together in a presentable format for tutor and peer review for the first and final time. The whole point of this semester has been to create 6 to 8 images in the categories of Landscape, People, and Object, and then 10 to 12 images in a story of Personal Expression. All the theory and exercises and failures and reshoots and successes have bought us to this ... a small step for image making personkind.
The environment in which we have been allowed to operate has been great. Our tutor Scott is just a classic creative and teacher - he has always been supportive and constructive and doesn't hesitate in giving of his expertise to help out. Very very cool. The other people doing the course have also on the whole been great peers and feedback givers and supporters to each other. A great experience all round and one I will continue with next year.
In closing this section of the blog, here are the images that I presented as my final Semester 1 portfolio.


Folio Category : Personal Expression


Folio Category : Landscape


Folio Category : Object


Folio Category : People

Workshop Experience : Photography Studies College Week #16 and #17

Getting down near end of Semester 1 so a combined report and a few folio images. Enjoy !
Two weeks in one again this time. As we are getting to the pointy end of end of semester 1 an our portfolio presentation, our classes have been mainly about image review and getting peer feedback etc.

We did go through White Balance and Colour Balance though which is a very detailed and complex area - if you let it. As I shoot always in RAW, and I don't necessarily use my viewfinder that much (never for street at least) I normally just keep my WB on AUTo and do any adjustments in post of needed. When I do portraiture or landscape though, it is good to see exactly what it is you are capturing at the time, so then I do set the WB to the Kelvin that I think I want it too be. I say think because I am still learning the mixes of light colour and how WB adjustments affect the end image effect I want.
Our tutor Scott who is a master of light and flash and natural went in to how he approaches shoots and the mix of light and thats when it gets really busy. He also adds gel effects to his flash or light elements to get certain effects and moods which are truly amazing. This is the absolute art and skill of painting with light, and then capturing it.
Scott also took us through the life of being a professional photographer. Very illuminating and inspiring, albeit with cautionary notes as with any profession. Scotts' firm advise was that given where technology and the industry is now, specialisation is key and he advised us to stick to something we know and are good at, and carve out a market with that if we are interested in going full time. Sound advice.
These are some images I put up for review and possible folio inclusion. I have also done something have never done before and submitted two photos in an exhibition for possible judging. Will let you know if anything happens but really its all about being part of the process and at least getting exhibited for a bit (every entry does !).


Workshop Experience : Photography Studies College Week #15

Plenty of gear envy this week as our professional tutor opens up his kit bags ! Also a focus on some still life. Enjoy.
This week was another different tangent week as we approach ever nearer to our portfolio presentations.
Scott took us through the lens kit list for a professional, and showed us all his standard and non standard issue lenses and how he uses them on the different bodies he also gets issued.
The usual classic lenses were there - the nifty fifty of course (50mm prime from Canon) along with the IS version of the 70 to 200 mm telephoto.
My favourite the 16 to 35mm was also part of his to go to kit, and then he pulled out his new proud and joy, the 85mm prime. All of the red band and or white series of course! Couple with a 1D and new 5D body, the kit bag is complete !
Great to hear from a professional how he uses different lenses, why, and the stories he attaches to each of them. Which one to use always goes back to what is it you want the frame to say or portray or communicate, then choice the lens that does that in spades.
And as Scott finished by saying, only buy lenses once you reach the limits of what you already have, or if your current lens is restricting you from achieving the look that you are after. I recently purged a lot of my lenses and have now settled on just a few, although it could get even smaller. After all, choice and indecision ruins a good photograph.
I currently have settled on :
Leica Q with 28mmm prime for all simple street activity
Leica M6 with 35mmm ASPH Summicron for film street work
Leica M-P 240 with 50mm Summilux for street, night, still-life and portrait work
Canon 6D with 16-35mm and 70-200mm for landscape, starscape, and still life work
DJI P3P UAV with 20mm lens for aerial work
That will do me ! Too much choice in above still so will ween myself down even further over time I am sure.


Had to ramp up some still life images for the portfolio. Played around with some objects in the house, just using natural morning light inside plus a black background. Work to be done. Used my 6D with the 16-35mm lens to get some scale effects as best I could. All at ISO100, shutter speeds 1/500 to 1/2000 @ f5.6 or so.
Next week we go !

Workshop Experience : Photography Studies College Week #14

Still life was on the agenda in class this week, and I also go through a little more aerial work that I have been doing.
Well it's getting closer to portfolio creation time and the time pressures are rising. I am way off on my Still Life and Personal portfolio sections, but hope to start this week in ticking some content boxes there ....
In class this week we looked in to Still Life as it happened, so a timely insight into an area of photography I personally have not really explored too deeply.
Scott took us through some category basics, and then we focussed the work of Chema Madoz. Amazing. Simple. Uncluttered. Quite enthralling and inspiring.

© Chema Madoz
All the usual creative foundations apply to still life - composition, colour, lighting, etc - and the form exists in two categories : Constructed and Found Object. There is also an unwritten guide that suggests the object(s) must be able to be placed on a table top - i.e size is modest.
So what differentiates average and good still life frames? Light, Depth of Field and Design. Look through some of Madoz's work and he has nails did all and some.
I immediately started thinking about what line I could take and have decided I will follow a project around "Drawers". Still Life interpretations of what we put in our various shaped drawers - kitchen, garage, rooms, etc. Will see how we go and I will post some early ideas as I go.


Been getting out with the drone for some aerial work of late, and really enjoying it. The Melbourne morning light at dawn is getting stronger and causing contrast almost from the get go of sunrise which is great for the abstract look I am trying to refine. The above frames are from a nearby to home marina and skate park. The skate park angles in particular came up well I thought.
On a practical note, DJI updated their DJI Go app and with usual DJI style, little supporting documentation came along with it (sigh). For this missing the extra camera menu that you used to press and hold the shutter button, its now folded in to the main camera menu under Photo. All the functions are now in there - HDR, AEB, multi exposure, etc.
Given the limitations of the Phantom3 pro camera (fixed aperture mainly) the settings I have been using are getting a little more refined. For maximising the EV range of the captured image, I am using the log colour profile, customer contrast down by 1, sharpness down by 1, RAW setting, and manual. I am using AEB every now and then but prefer to do the bracketing manually by adjusting shutter speed. Then little bit of post processing wither in Photomatix and/or LR, and they are pretty good. (until someone offers me an Inspire Pro to play with (-: ).
I also purchased the Headplay POV goggles, and will drop a few impressions on them soon once I have a good crack at it - without vomiting. Not using it for photography but more for keeping my daughter amused whilst I fly around taking images.
Until next time !